
Ever wondered why some sheds stand rock-solid for decades while others end up cracked, wonky, or waterlogged within a few years? What’s the secret behind a shed that actually lasts? And more importantly, how can you make sure yours doesn’t become an expensive mistake?
The answer lies beneath your feet – literally. Proper ground preparation is the unsung hero of any successful shed project. Whether you’re planning a small garden storage space or a larger workshop, getting the foundation right makes all the difference. Skip this crucial step, and you’re setting yourself up for headaches down the track.
In this guide, we’ll walk you through everything you need to know about preparing ground for shed slabs Melbourne. From selecting the perfect spot to compacting soil and building formwork, we’ve got you covered. You’ll learn what materials to use, how thick your slab should be, and which common mistakes to avoid. By the end, you’ll feel confident tackling this project yourself – or at least know exactly what to expect if you hire a professional.
What Is a Shed Slab and Why Do You Need One?
A shed slabs is simply a flat concrete foundation that supports your shed structure. Think of it as the anchor that keeps everything stable, level, and protected from ground moisture. Without one, your shed sits directly on soil that shifts, settles, and absorbs water – none of which are good news for your belongings.
Types of Shed Slabs for Australian Conditions
Australian conditions can be pretty harsh on outdoor structures. You’ve got several options depending on your needs and budget. Standard concrete slabs work brilliantly for most residential sheds. For lighter structures, some people opt for concrete pavers or gravel bases, though these aren’t as durable long-term.
Reinforced slabs with steel mesh are the gold standard, particularly in areas with reactive soils. These handle ground movement much better than plain concrete.
Do I Need Council Approval for a Shed Slab in Australia?
Here’s something many people overlook – council regulations. In most Australian states, sheds under a certain size (typically 10-15 square metres) don’t require a building permit. However, this varies between councils, so always check with your local authority before starting work. Better to spend ten minutes on a phone call than face costly fines later.
Tools and Materials You’ll Need
Before getting your hands dirty, gather everything you need. Running to the hardware store mid-project is frustrating and wastes valuable time.
Essential Equipment Checklist
You’ll need a shovel and mattock for excavation, a wheelbarrow for moving materials, string lines and wooden stakes for marking out, a spirit level (preferably a long one), a plate compactor (hire this), and a rake for spreading gravel. Don’t forget safety gear – gloves, safety glasses, and sturdy boots are non-negotiable.
For formwork, grab some timber boards, wooden pegs, a hammer, and screws. A square or builder’s square helps guarantee your corners are spot-on.
Choosing the Right Concrete Mix for Shed Slabs
Standard 20-25 MPa concrete suits most shed applications perfectly. For heavier loads or vehicle access, step up to 32 MPa. Ready-mixed concrete delivered by truck saves enormous effort for larger slabs, while bagged mix works fine for smaller projects.
How Do I Prepare the Ground for a Concrete Shed Slab?
Now we’re getting to the good stuff. Follow these steps carefully, and you’ll create a solid foundation that lasts.
Step 1: Selecting and Marking Out Your Site
Choose a spot that’s naturally well-drained and relatively level. Avoid areas where water pools after rain. Using string lines and wooden stakes, mark out your slab dimensions, adding about 100mm extra on each side for working room. Double-check your measurements – measure twice, dig once!
Step 2: Clearing Vegetation and Debris
Remove all grass, weeds, roots, and organic matter from within your marked area. This stuff breaks down over time and creates voids under your slab. Be thorough here; even small roots can cause problems later.
Step 3: Excavating to the Correct Depth
Dig down to accommodate your sub-base (typically 100mm of gravel) plus your slab thickness (usually 100mm for standard sheds). That means excavating roughly 200mm below your desired finished level. Keep the floor of your excavation as flat as possible.
Step 4: Levelling the Ground Properly
Use a spirit level and straight edge to check your excavation is level. This step takes patience, but it’s absolutely worth it. An unlevel base means an unlevel slab, which causes doors to stick and water to pool.
Step 5: Compacting the Soil Base
Here’s where that plate compactor earns its hire fee. Compact the exposed soil thoroughly, making multiple passes across the entire area. Well-compacted soil prevents settlement that leads to cracking. If your soil is particularly soft or sandy, consider adding a layer of road base before the gravel.
How Thick Should a Concrete Slab Be for a Shed?
Slab thickness isn’t a one-size-fits-all situation. Getting it right depends on what you’re storing and how big your shed is.
Recommended Thickness for Different Shed Sizes
For small garden sheds storing tools and light equipment, 75-100mm thickness works well. Medium-sized sheds benefit from 100mm slabs, while larger workshops or sheds housing heavy equipment need 100-150mm. When in doubt, go thicker – the extra concrete cost is minimal compared to fixing a cracked slab.
Load-Bearing Considerations
Planning to store a car, boat, or heavy machinery? You’ll need to factor in concentrated loads. Vehicles, in particular, put significant pressure on slabs, so 150mm with additional reinforcement is wise. Chat with a structural engineer if you’re unsure about specific load requirements.
What Do You Put Under a Concrete Slab for a Shed?
What goes under your slab matters just as much as the concrete itself. Think of it as building in layers, each serving a specific purpose.
Adding a Crushed Rock or Gravel Sub-Base
Spread 100mm of crushed rock or blue metal across your excavated area. This creates a stable base that drains water away and distributes weight evenly. Rake it level, then compact thoroughly with your plate compactor.
Installing a Vapour Barrier
Lay heavy-duty plastic sheeting (200 microns minimum) over your gravel base. This barrier stops ground moisture wicking up through your slab – crucial for preventing dampness and protecting stored items. Overlap joins by at least 200mm and tape them securely.
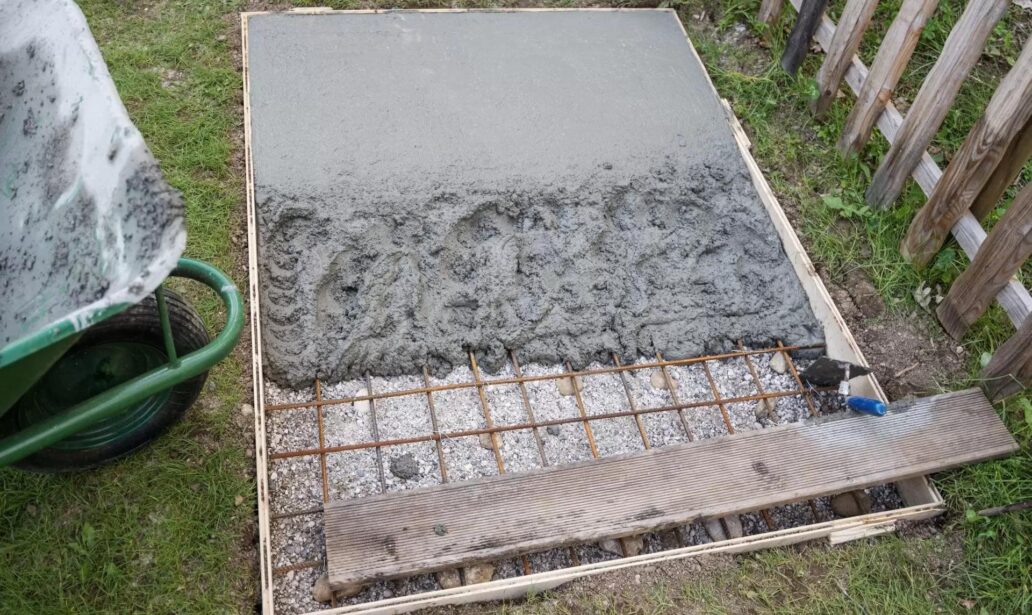
Laying Reinforcement Mesh
Position steel reinforcement mesh (typically SL72 or SL82) across your slab area. Use bar chairs or small concrete blocks to keep the mesh elevated about 50mm from the bottom – it needs to sit within the concrete, not beneath it.
Building the Formwork
Formwork holds your wet concrete in shape while it cures. Getting this right guarantees clean edges and the correct dimensions.
How to Set Up Timber Boxing
Use straight timber boards (90x45mm works well) secured with wooden pegs driven into the ground. The top of your formwork should sit exactly where you want your shed slabs surface. Oil the inside faces lightly to make removal easier later.
Ensuring Square Corners and Level Edges
Check corners using the 3-4-5 triangle method – measure 3 metres along one edge, 4 metres along the adjacent edge, and the diagonal between should equal exactly 5 metres. Level edges using a spirit level, adjusting timber heights as needed.
Drainage Considerations for Shed Slabs
Water is concrete’s enemy. Proper drainage planning protects your investment long-term.
How Do I Stop Water Pooling Under My Shed?
Grade the surrounding ground away from your slab at a gentle slope (about 1:100). Install agricultural drainage pipes around the perimeter if your site is particularly wet. A slight fall across the slab surface (2-3mm per metre) also helps water run off rather than sitting.
Grading and Slope Requirements
Your finished slab should sit at least 100mm above surrounding ground level. This prevents surface water from entering your shed and allows adequate airflow underneath timber frame structures.
Common Mistakes to Avoid When Preparing Ground for Shed Slabs
Learning from others’ errors saves time, money, and frustration. Skipping soil compaction tops the list – it’s tedious but essential. Forgetting the vapour barrier causes ongoing moisture problems. Placing reinforcement mesh too low renders it ineffective. Setting formwork out of square creates headaches when installing the shed. Plus, pouring concrete in extreme heat or cold compromises strength.
Can I Prepare the Ground Myself or Should I Hire a Professional?
DIY vs Professional Installation
Ground preparation is achievable for confident DIYers with basic skills and the right equipment. The work itself isn’t technically complex – it’s more about patience and attention to detail. However, larger slabs or difficult sites benefit from professional expertise.
Cost Considerations in Australia
DIY ground prep costs primarily involve equipment hire (plate compactor, perhaps a small excavator) and materials. Expect to spend depending on size. Professional preparation adds labour costs but brings experience and often faster completion.
Setting Your Shed Up for Success
Getting your ground preparation right is genuinely the most important part of any shed project. Rush this stage, and you’ll regret it for years to come. Take your time, follow each step properly, and you’ll create a foundation that serves you well.
Remember the key points: excavate deep enough, compact thoroughly, include proper drainage, and don’t skimp on the vapour barrier or reinforcement. These elements work together to create a slab that handles whatever you throw at it.
Whether you tackle this yourself or bring in the professionals, you now know exactly what’s involved. So grab your shovel, mark out that site, and get started on creating the perfect base for your new shed. Your future self will thank you when everything stays level, dry, and crack-free for decades to come.